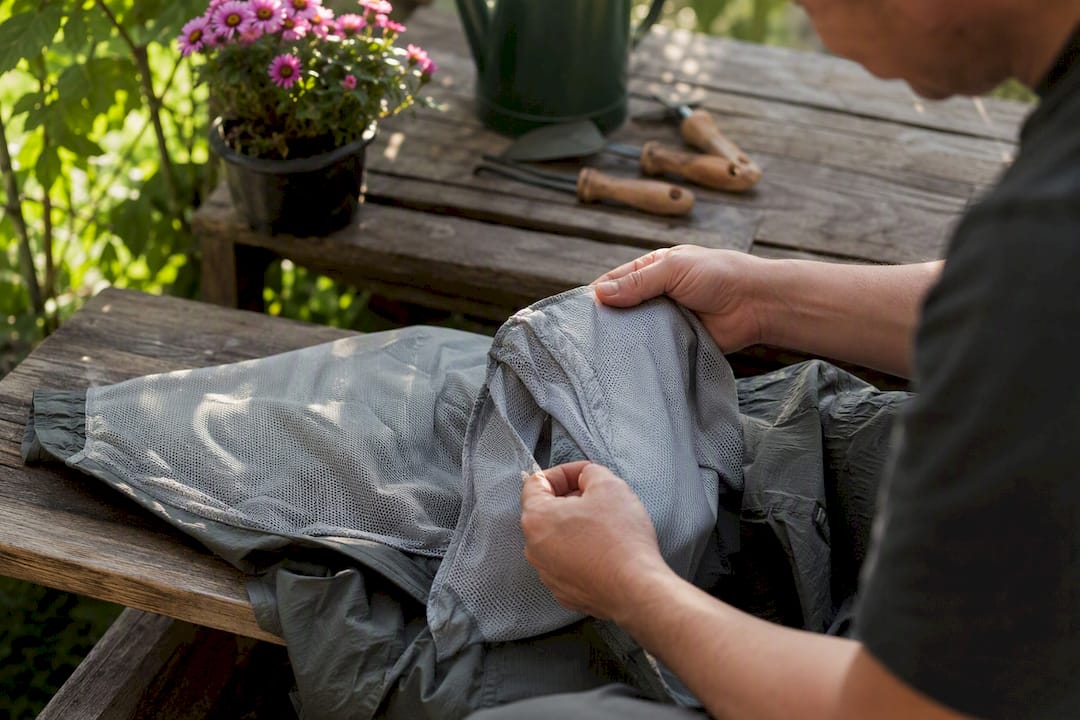
Check clothing in bright light, turn every garment inside out, run a lint roller over seams and cuffs, and tumble dry on high heat for at least 10 minutes before those clothes touch anything else in the house. Do a lower-body scan every 60 to 90 minutes outdoors, then a full check the moment you’re back inside. Mesh clothing like Bug Away pants blocks most ticks from reaching skin, but no fabric catches everything that crawls onto it.
TL;DR:
- Regularly inspect clothing for ticks every 60 to 90 minutes outdoors, focusing on seams, cuffs, waistbands, and folds where ticks cling.
- Use a lint roller on inside-out garments and high heat tumble drying for at least 10 minutes to reliably kill attached ticks.
- Check gear such as boots, socks, and backpacks with a brush or vacuum, paying special attention to seams, straps, and crevices to remove hitchhikers.
- Conduct a full-body inspection after outdoor activities, paying close attention to areas where fabric or skin are unsealed, ideally in bright light and after a shower.
- Proper fit and sealed closures in mesh clothing significantly reduce tick entry points, but routine inspection remains essential for effective protection.
Table of Contents
- How to check for ticks on mesh clothing
- Checking gear and footwear for hitchhiking ticks
- The quick check-check routine while you’re outside
- Laundering and drying to kill ticks on clothing
- Your 90-second post-outing checklist
- Doing a full-body check the mesh can’t cover
- How long a proper tick check actually takes
- Spotting an attached tick versus a piece of debris
- Why the checklist matters more than the fabric alone
- Bug Away pants: sizing, fit, and what to check before you buy
- Sources
How to check for ticks on mesh clothing
Ticks don’t drop onto you from trees. They quest from grass and low brush, latch onto fabric, and climb, which means the zones where they cling are predictable: seams, cuffs, waistbands, pockets, collars, zippers, and ankle hems. Any place where fabric folds or overlaps gives a tick something to grip.
Start the inspection under bright light, ideally daylight through a window or an LED work light, not a dim hallway fixture. Turn the garment inside out first. Seams show up better from the reverse side because the stitching creates a visible ridge a nymph can hide against. Spread the fabric flat on a table rather than holding it up and eyeballing it. Then run a lint roller slowly along every seam, cuff, and fold. Nymph-stage ticks are roughly the size of a poppy seed, and a lint roller picks up what your eyes miss.
Feel the elastic at cuffs and waistbands with your fingers, too. A crawling tick registers as a tiny bump before you’d ever spot it visually.
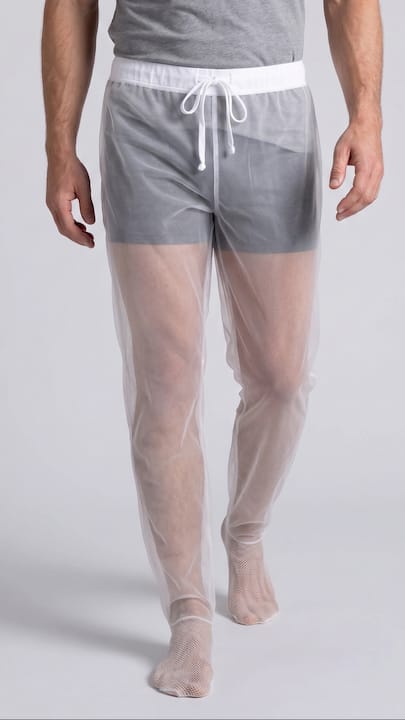
Design matters here. Sealed cuffs, overlapping ankle hems, and integrated foot coverage close the gaps ticks use to get underneath a garment, which is why Bug Away builds those features into its mesh pants rather than relying on loose hems. Stretch fabric is the tradeoff to watch: research on bite-blocking textile structures shows that when knit fabric pulls tight over knees or hips, the mesh openings widen slightly and the barrier weakens exactly where it matters most.
Pro Tip: Check the fabric while it’s stretched across a bent knee or raised arm, not just lying flat. If the weave gapes visibly under stretch, that’s a spot to patch, or a sign the garment has stretched out and needs replacing.
One more habit worth building: never shake clothing indoors to “clear” it. Shaking dislodges crawling ticks into carpet or bedding instead of removing them. Do the inspection in one contained spot, like a mudroom or garage, every time.
Checking gear and footwear for hitchhiking ticks
Boots, socks, and backpacks pick up ticks just as easily as clothing, and they’re easy to forget because they don’t touch skin directly.
The hotspots to check every time:
- Boot seams, tongues, and the inside of the collar where the boot meets your ankle
- Sock cuffs, especially where they fold over the top of a boot
- Backpack hip belts, shoulder straps, and outer mesh pockets
- Tent doors and sleeping bag zippers if you camped
For smooth surfaces, a lint roller works fast. For crevices like boot seams or pack straps, brush them out over a light-colored surface so anything that drops is visible. Non-washable items, like a backpack or tent, do better with a vacuum. Empty the canister outside, not into your kitchen trash.
Gaiters and integrated foot coverage close the gap between boot and pant leg, which is the single most common entry point for ground-questing ticks. Treat gear inspection as a doorway ritual: check it before it crosses the threshold, not after it’s already on the closet floor.
The quick check-check routine while you’re outside
Ticks need time to find skin and attach, so catching them early on clothing beats finding them attached later. A workable rhythm: a fast lower-body scan every 60 to 90 minutes while you’re out, then a full inspection the moment you’re back.
The after-return sequence:
- Remove your outer layer in one designated spot, like a mudroom, entryway, or garage.
- Turn everything inside out immediately.
- Lint-roll the seams, cuffs, and waistband before setting the clothing down anywhere else.
- Check your ankles, behind your knees, and your waistline first, since ticks climb from the ground up and these are the first skin they reach.
- Toss clothing straight into the dryer on high heat, or into the wash if it needs cleaning first.
Focusing on the lower body isn’t arbitrary. Ticks quest from leaf litter and low grass, then climb upward along pant legs and sock cuffs until they hit a seam, waistband, or bare skin. That’s also why experts stress that no single garment offers complete protection and inspection has to happen every time, mesh or no mesh.
Pro Tip: Kids need their own check, done by an adult, not a self-check. Stash their outdoor clothes in a separate bag or bin until they’re washed. Don’t pile them with yours or the family laundry.
Laundering and drying to kill ticks on clothing
Heat, not detergent, is what kills a tick. The CDC recommends tumble drying dry clothing on high heat for at least 10 minutes, and longer if the clothing came in damp from rain or sweat. If clothes need washing first, use hot water; a cold or warm wash cycle alone won’t reliably kill a tick that’s still attached to fabric.
For gear that can’t go in a washer or dryer, tools like a lint roller or a vacuum do the job instead. Vacuuming picks up nymphs missed by the eye, and emptying the canister outdoors keeps anything alive from ending up back in your house.
Mesh garments need a lighter touch than heavy canvas. Repeated high-heat drying cycles can degrade the weave over time, so:
- Wash mesh clothing on a gentle cycle when possible
- Reserve high-heat drying for after actual outdoor exposure, not every laundry day
- Lean on lint-rolling and inspection as your everyday defense, saving the dryer for the heavier disinfection pass
The decision rule is simple: washable clothing gets a hot wash followed by 10-plus minutes on high heat. Non-washable gear gets vacuumed and isolated until you’re confident it’s clear.
Your 90-second post-outing checklist
- Remove outer layers in one spot, not the whole house.
- Lint-roll seams, cuffs, and waistbands.
- Turn clothing inside out and inspect visually.
- Wash hot if needed, then dry on high heat for 10+ minutes.
- Check gear: boots, socks, pack straps.
- Check pets if they were out with you.
- Store unchecked clothing separately until it’s been through the routine.
Doing a full-body check the mesh can’t cover
Clothing handles most of the job, but skin contact still happens at collars, wrists, and anywhere fabric doesn’t fully seal. A full-body check catches what slipped past the barrier.
Work top to bottom in a well-lit bathroom, ideally right after a shower, since water loosens a tick’s grip slightly and makes the check easier. Run your fingers through your scalp in sections, the way you’d check for a stray splinter, since hair hides a nymph completely from sight. Check behind and inside the ears next, then the back of the neck along the hairline.
Underarms are another spot people skip because you can’t see them without lifting an arm and looking, or having someone else look. Do the same for the groin and waistband area, where fabric elastic often sits directly against skin. Behind the knees and between the toes round out the list, both places where skin folds create the same kind of hiding spot a seam does on clothing.
Anywhere you can’t see directly, mirror or partner check. Kids and pets need someone else to do this for them; a self-check misses the back of the neck and scalp almost every time. Keep a small handheld mirror in the bathroom during peak tick season if you’re checking alone.
How long a proper tick check actually takes
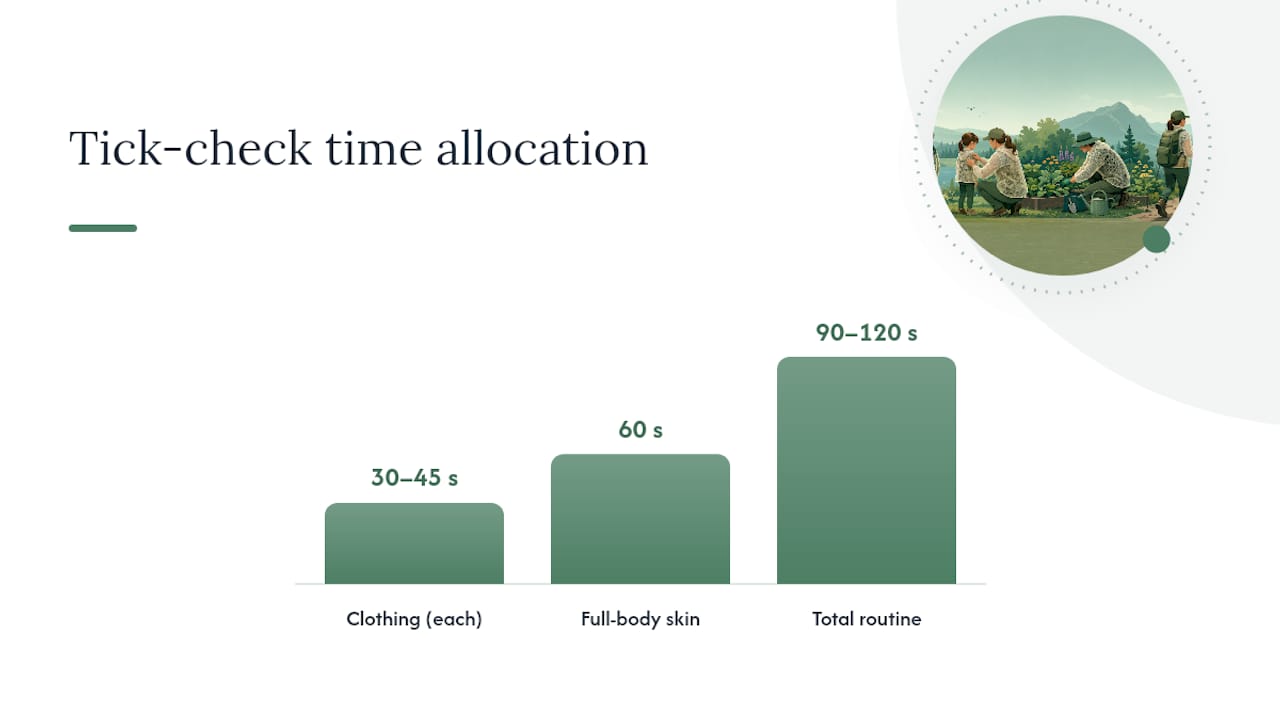
A thorough check, clothing plus skin, takes about 90 seconds to two minutes once it’s a habit. That’s the honest number, and it’s shorter than most people assume before they’ve done it a few times.
The clothing pass, inside-out inspection plus a lint roller over the seams, takes 30 to 45 seconds per garment if you’re not hunting for anything unusual. The full-body skin check adds another minute: scalp, ears, neck, underarms, waistline, groin, and behind the knees, moving in order so you don’t skip a zone.
Where people lose time is searching randomly instead of following a set path. A check with no routine can drag to five minutes and still miss spots, because you’re relying on memory instead of a sequence. A check that follows the same order every time, clothing first, then skin top to bottom, gets faster with repetition and doesn’t get less thorough.
Rushing defeats the purpose, though. A tick needs time attached to transmit disease, so a fast but incomplete check that skips the scalp or behind the knees isn’t actually faster in any way that matters. Build the habit once, and the two minutes becomes automatic rather than a chore you talk yourself out of.
Spotting an attached tick versus a piece of debris
A tick that’s found a spot and settled in looks and feels different from a fleck of dirt, a scab, or a random bug. The clearest sign is a small, dark, stationary bump that doesn’t brush off with a finger the way debris does. An attached tick is anchored into the skin, so it resists a light wipe.
Size and shape help too. An unfed tick is flat and roughly the size of a sesame seed or smaller for a nymph. One that’s been attached for a day or more swells and can look more like a small dark grape, which surprises people who expect it to still look bug-shaped. Debris, a scab, or a mole doesn’t swell over the course of a day the way an engorged tick does.
Legs are the giveaway when you’re unsure. A tick has eight legs visible near the head end, even when engorged, while a scab or freckle obviously has none. If you’re checking a spot and can’t tell whether it’s a tick or a skin tag, look for legs and for slow, subtle movement, since a tick recently attached will sometimes still be adjusting position.
Ticks are painless on attachment, which is part of why they’re missed. There’s no bite sting to alert you the way a mosquito bite announces itself. That’s the whole argument for a scheduled check instead of waiting to feel something.
Why the checklist matters more than the fabric alone
People buy protective clothing expecting it to be a finish line. It’s not. A case-control study on personal prevention measures found protective clothing cut Lyme disease risk by roughly 40% in the population studied, which is a meaningful reduction, but it also means well over half the remaining risk comes down to what you do after you get dressed.
That’s the gap most tick advice glosses over. Bug Away builds sealed cuffs and integrated foot coverage into its mesh pants because those design choices close the entry points a loose hem leaves open, and the feedback from more than 500 customers who report zero tick bites while wearing the gear backs up that the physical-barrier approach works when it’s paired with a check routine, not treated as a substitute for one. The 30-day money-back guarantee exists because Bug Away expects the clothing to earn that confidence in real use, not just in a lab.
The honest takeaway: mesh clothing shifts the odds heavily in your favor. It doesn’t erase the need to look.
— Thomas
Bug Away pants: sizing, fit, and what to check before you buy
Bug Away makes two chemical-free mesh pants, one cut for men and one for women, both built with integrated foot coverage and sealed ankle closures so ticks can’t climb up under a loose hem the way they can with regular hiking pants.

Fit matters more than most buyers expect. A pant that stretches tight across the knees or hips widens the mesh openings right where ticks are most likely to make contact, so size up rather than down if you’re between two sizes, and check the fit chart on each product page before ordering. The mesh is designed to breathe in heat and hold its shape wash after wash, but gentle laundering preserves that structure longer than repeated high-heat drying.
If the fit or feel isn’t right once you’ve worn them outdoors, Bug Away backs every order with a 30-day money-back guarantee, no complicated return process required. Browse Bug Away Pants for men or Bug Away Pants for women and pick the size using the chart on each page before you check out.
Sources
- Case-control study on personal prevention measures and Lyme disease
- TickEncounter prevention: protect yourself
- Preventing tick bites (CDC)